Step 5 allows you to specify formatting options for the report. Note that dimensions are either in inches (shown as “in”) or centimeters (shown as “cm”), depending on the units you selected in the Options dialog.
The options in this step are:
-
Edit Advanced Layout: click this button to create and edit the advanced layout for the report.
-
Delete Advanced Layout: click this button, which is only enabled if the report has an advanced layout, to remove the advanced layout from the report.
-
Advanced Report Properties: click this button to display the Advanced Report Properties dialog so you can change some advanced settings. This button is disabled if you haven’t selected any fields for the report.
-
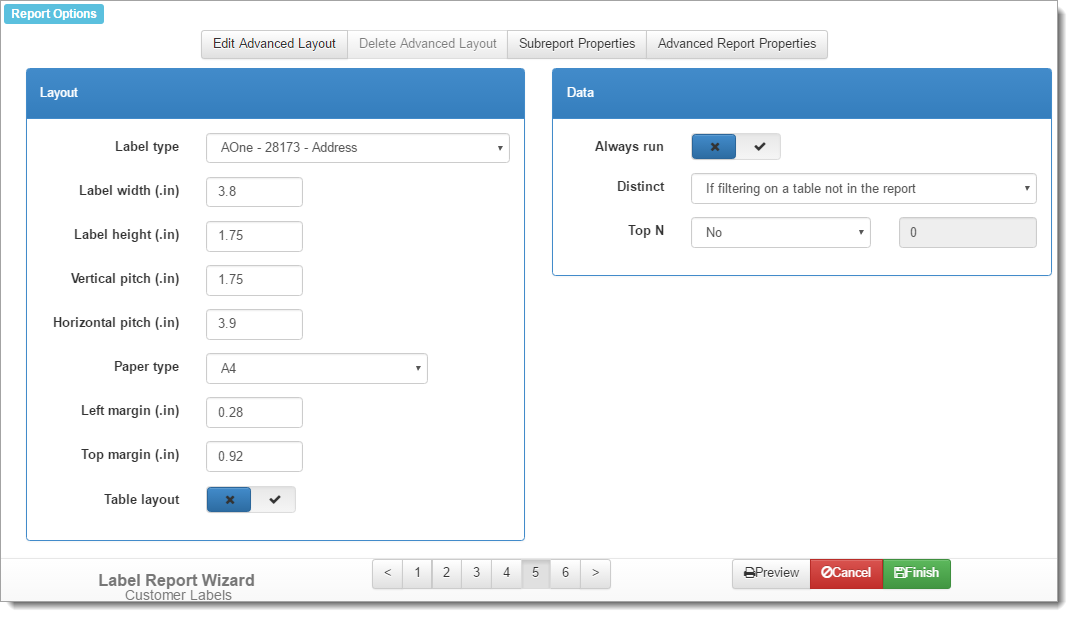
Label type: choose the desired label type from the drop-down list of choices. Note that if you choose a label that isn’t tall enough for the fields in the report (for example, the report has eight fields but you specify a 1 inch high label which can only accommodate six lines), the text in the label is cut off. Be sure to preview the report to ensure you’ve selected the correct label size. A rule of thumb to use is that labels print six lines per inch.
Once you’ve chosen the label type, the dimensions of the label are filled in automatically. You can tweak the layout if you wish by adjusting these values.
-
Label width: the width of one label.
-
Label height: the height of one label.
-
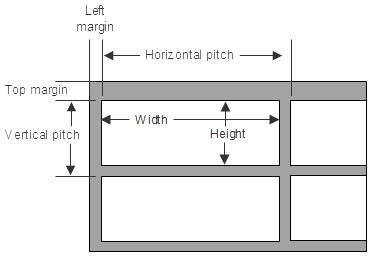
Vertical pitch: the distance from the left edge of one label to the left edge of the label beside it.
-
Horizontal pitch: the distance from the top edge of one label to the top edge of the label below it.
-
Paper type: you can choose from the drop-down list of all standard paper types, such as letter, legal, and A4.
-
Left margin: the distance from the left edge of the page to the first label.
-
Top margin: the distance from the top edge of the page to the first label.
-
Table layout: by default, Horizon Reports uses absolute positioning to render a report in the Preview window. While that normally works well, if you find that some objects aren’t positioned properly, you may wish to use HTML tables to render the report instead. In that case, turn this setting on.
-
Always run: turn this option on to run the report even when there are no records that match your filter condition. This results in a blank report. If this option is turned off, rather than displaying a blank report, Horizon Reports displays a message that there are no records.
-
Distinct: if you filter on a field from a table that isn’t involved in the report, you may end up with what appear to be duplicate records. For example, say your report displays the Company Name and Contact Name from the Customers table. If you filter on the Product Name from the Products table being “Apricot Jam” (in other words, you want a list of customers who bought that product), you’d end up with each customer showing up once for every order they placed for that product. So, if Sam’s Grocery ordered it 25 times, they’d appear on the report 25 times. That isn’t typically something you’d want, so Horizon Reports can eliminate these duplicate records for you.
The DISTINCT clause in a SQL statement tells the database to only find records that have distinct values, so adding that clause to the SQL statement means that Sam’s Grocery only shows up once. The Retrieve distinct records option allows you to control whether the DISTINCT clause is used or not. “Never” means don’t add a DISTINCT clause to the SQL statement for this report and “Always” means do add it. “If filtering on a table not in the report” means only add the DISTINCT clause if you filter on a field from a table that isn’t involved in the report.
You might think that “If filtering on a table not in the report” should always be used. However, there may be times when this isn’t the correct behavior. For example, if you want to show fields from the Orders table (Order Date, Product Name, and Quantity Ordered) but filter on Company Name is “Sam’s Grocery,” Horizon Reports eliminates what it thinks are duplicate records, such as two orders for the same product and same quantity on the same day. Clearly, this isn’t right—you’d end up with some missing data. In that case, set this option to Never.
-
Top N: this option allows you to display only the top records. If you set this option to something other than “No,” you can enter a number and indicate whether that number is the number of records you want (the “Count” setting) or a percentage of the total records such as the top 10 percent (the “Percent” setting). Note that “top” refers to the sort order for the report. For example, if the report is sorted alphabetically by Company Name, you’ll get the specified number of records in alphabetical order. If the report is sorted in descending by Order Date, you get the specified number of most recent orders.