The Security function in the Tools menu allows administrators to add, edit, and delete users who are authorized to use Horizon Reports and define roles those users fall into. Roles are key to Horizon Reports security; when a report is created, one of the options is which roles have rights to that report. This is sometimes referred to a role-based security, where a particular group of users have a role, such as clerks or managers.
In addition, you can define tenants, which are different organizations that can access Horizon Reports but only see their own data.
When Horizon Reports is first installed, a single user with the name admin and password admin is authorized to use Horizon Reports. There are also three roles Administrator, Tenant Administrator, and Everyone. The Administrator role consists of those users who can access the Security dialog. Tenant Administrators can also access the Security dialog but only to manage users and roles for their tenant. All Horizon Reports users are automatically members of the Everyone group.
If the logged-in user is a member of the Administrator role, the Security function appears in the Tools menu. When this function is chosen, the following dialog appears
There are three pages of information in this dialog. The Users page allows you to add, edit, or remove users. The Roles page allows you to add, edit, or remove roles. The Tenants page allows you to add, edit, or remove tenants.
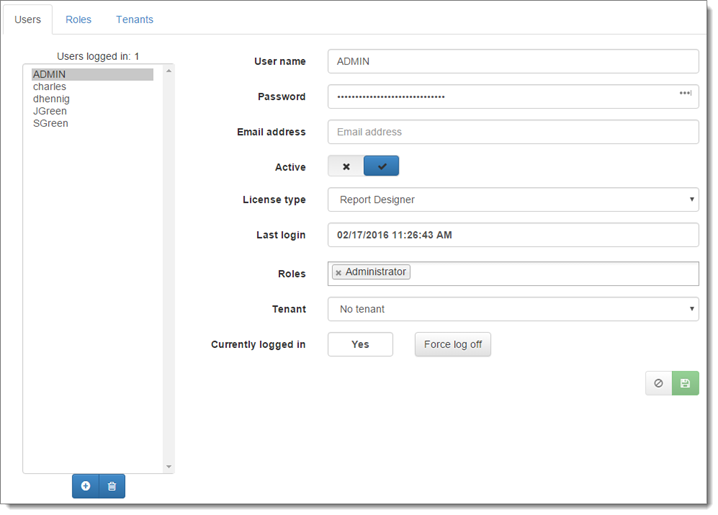
Users
The Users page allows you to maintain the users authorized to access Horizon Reports. At the left of the page is a list of authorized users; click one in the list to select it. Above the list is a count of the number of users currently logged in. To the right are properties about the selected user. The properties are
-
User name the name of the user.
-
Password the user’s password.
-
Email address the user’s email address. If an error occurs and the user chooses to submit a support ticket, this is the email address used for the ticket. This address is also used when you email a report to all users in a role.
-
Active turn this on (the default) for an active user or off for an inactive one. An inactive user can’t log into the application.
-
License type this setting indicates whether this user can create reports or not. If it’s set to Report Viewer, the New, Copy, and Edit functions in the Reports Explorer are disabled for that user. If it’s set to Report Designer, those functions are enabled. A Subscription Report Viewer or Report Designer is a license that expires.
-
Last login this displays the last date and time the user logged in.
-
Roles the roles the user belongs to. Click in the Roles area to display a drop-down list of roles. Select one from the list to add that role to the user. To remove a role, click the x to the left of its name. You can add as many roles as you wish to a user. If the user is responsible for maintaining users and roles for their tenant, add Tenant Administrator to their list of roles.
-
Tenant the tenant the user belongs to. Select the desired tenant from the drop-down list of tenants or No tenant if the user doesn’t belong to any tenant (usually only the ADMIN user).
-
Currently logged in display Yes or No depending on whether the user is currently logged in.
-
Force log off click this button to log the user off. This may be necessary if, for example, you plan to do maintenance on the application.
Click the  button to save changes to the user.
To add a user, click the  button. To delete a user, select the user in the list, then click the
  button. Note that you cannot delete the last user in the Administrator group or else no one can use this dialog again.
Roles
The Roles page allows you to maintain roles.
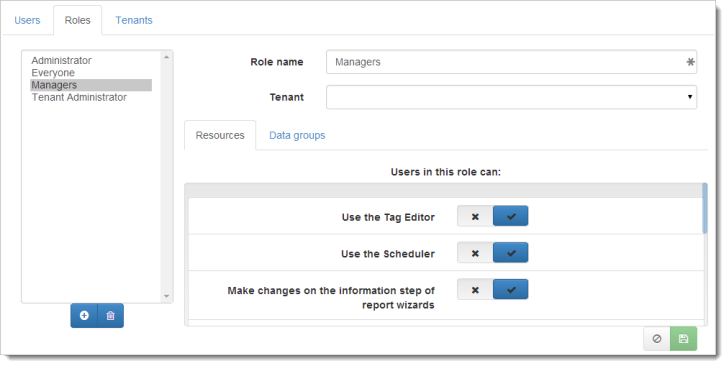
At the left of the page is a list of roles; click one in the list to select it. To the right are properties of the selected role. The properties are
-
Role name the name of the role. This is disabled for the Administrator and Everyone roles but is available for any other role.
-
Tenant the tenant the role belongs to; this isn’t available for the Administrator, Everyone, or Tenant Administrator roles. Select the desired tenant from the drop-down list of tenants or No tenant if the role is available to all tenants.
-
Resources this tab allows you to define which features the members of the role have access to. For example, if members can schedule reports, turn on the Use the Scheduler setting. If members can edit the properties of fields in a report but not add or remove fields, turn on the Change field properties in report wizards setting and turn off the Add and remove fields in report wizards setting.
-
Data groups this tab allows you to define which data groups the members of the role have access to. To indicate that members of the role have access to a particular data group, click the
 button to add the data group to the Data groups in roles list. To remove access to the data group, click the button.
 -
Data sources this tab allows you to define which data sources the members of the role have access to. To indicate that members of the role have access to a particular data source, click the
button to add the data source to the Data sources in roles list. To remove access to the data source, click the button.
Click the button to save changes to the user.
To add a role, click the button. To delete a role, select the role in the list, then click the button. Note that you cannot delete the Administrator or Everyone roles.
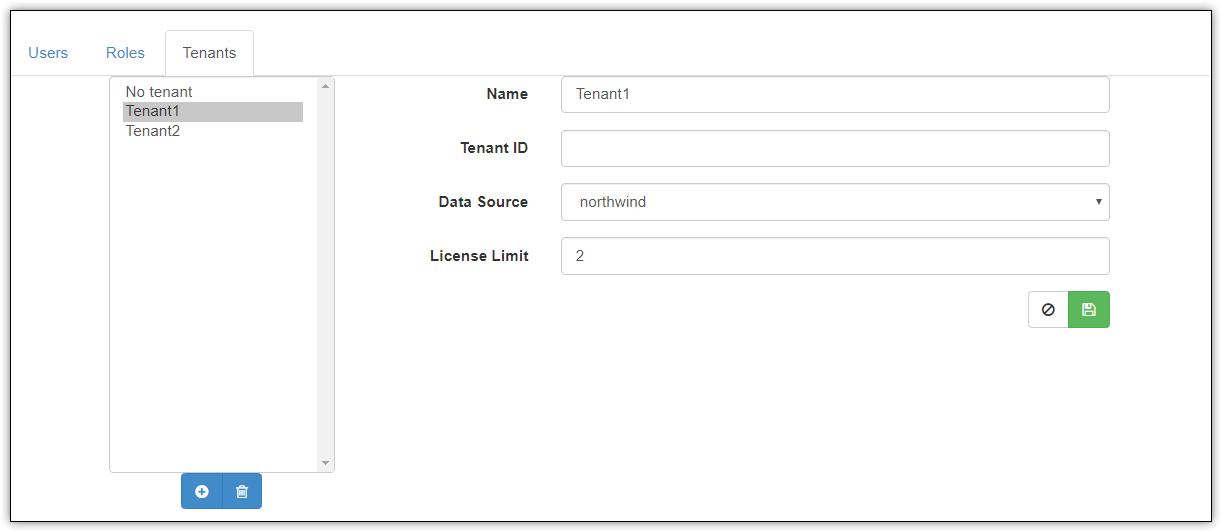
Tenants
The Tenants page allows you to maintain tenants. At the left of the page is a list of tenants; click one in the list to select it. To the right are properties about the selected tenant. The properties are
-
Name the name of the tenant.
-
Tenant ID the ID of the tenant. This is only needed if tenants share a database and records are identified by an ID.
-
Data source the data source users in the tenant connect to. Select the desired data source from the drop-down list. This is only used if each tenant uses a different database.
Click the button to save changes to the tenant.
To add a tenant, click the button. To delete a tenant, select the tenant in the list, then click the button.