You may wish to add your own formulas to a report. For example, suppose you pay commissions of 5% of the sales amount. You could output a report showing sales amounts to a Microsoft Excel document and then add a formula that calculates 5% of the amount, but it would be easier and more convenient to do it in Horizon Reports by defining your own formula.
There are two types of formulas: normal and grouping. A normal formula is one that calculates a value by evaluating an expression on each record. For example, a formula that calculates a 5% commission would have an expression something like “Amount * 0.05” and it would calculate that value for every record in the result set for a report.
A grouping formula is more complicated. It calculates a value but it goes through a set of records, often from a different table than the formula goes in, matching a filter and performing a summarization. For example, suppose you want columns in a report that show the sales for last year and the current year-to-date for each customer. Those aren’t single values retrieved from the database. Instead, for the first column, use a grouping formula that sums up the sales records for each customer for last year, and use a similar one but for the current year for the second column.
To create your own formulas, click the Create New Formula button in Step 2 of the report wizards or choose Formulas from the Tools menu and click the Create New Formula button in the Formulas dialog to bring up the Formula Editor.
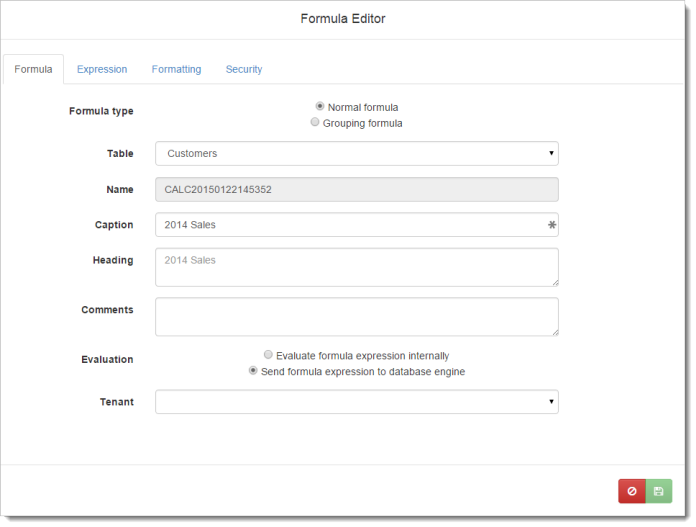
The Formula page has the following options:
-
Formula type: select the type of formula to use.
-
Data group: the module to select a table from. Only those modules installed on your system and you have rights to appear. Choose “All” to select any tables for the formula, regardless of module.
-
Table: the table the formula appears in.
-
Name: the formula is automatically given an internal name starting with “CALC” which cannot be changed. It is displayed for information purposes only.
-
Caption: the name of the formula as displayed in field lists such as in the report wizards. Note that the caption is displayed with a “[Formula]” suffix in the report wizards so you can tell which fields are actually formulas.
-
Heading: the default column heading for the formula. This is normally the same as Caption but could be different, such as an abbreviation (“Comm. Amt.”). You can specify multiple lines for the heading by pressing Enter where a new line should start.
-
Comments: enter any comments you want displayed in the Comments page of the Field Properties dialog.
-
Tenant: this control, which only appears if you’re an administrative user, allows you to define which tenant the formula belongs to. Choose the desired tenant from the drop-down list or No tenant if the formula is available to all tenants.
-
Evaluation: set this to Evaluate formula expression internally if you use any functions the database engine doesn’t understand, such as the functions listed in the Expressions and Function Reference. In that case, Horizon Reports requests any fields used in the expression from the database engine and then evaluates the expression itself. Choose Send formula expression to database engine if the database engine evaluates the formula. This setting gives better performance.
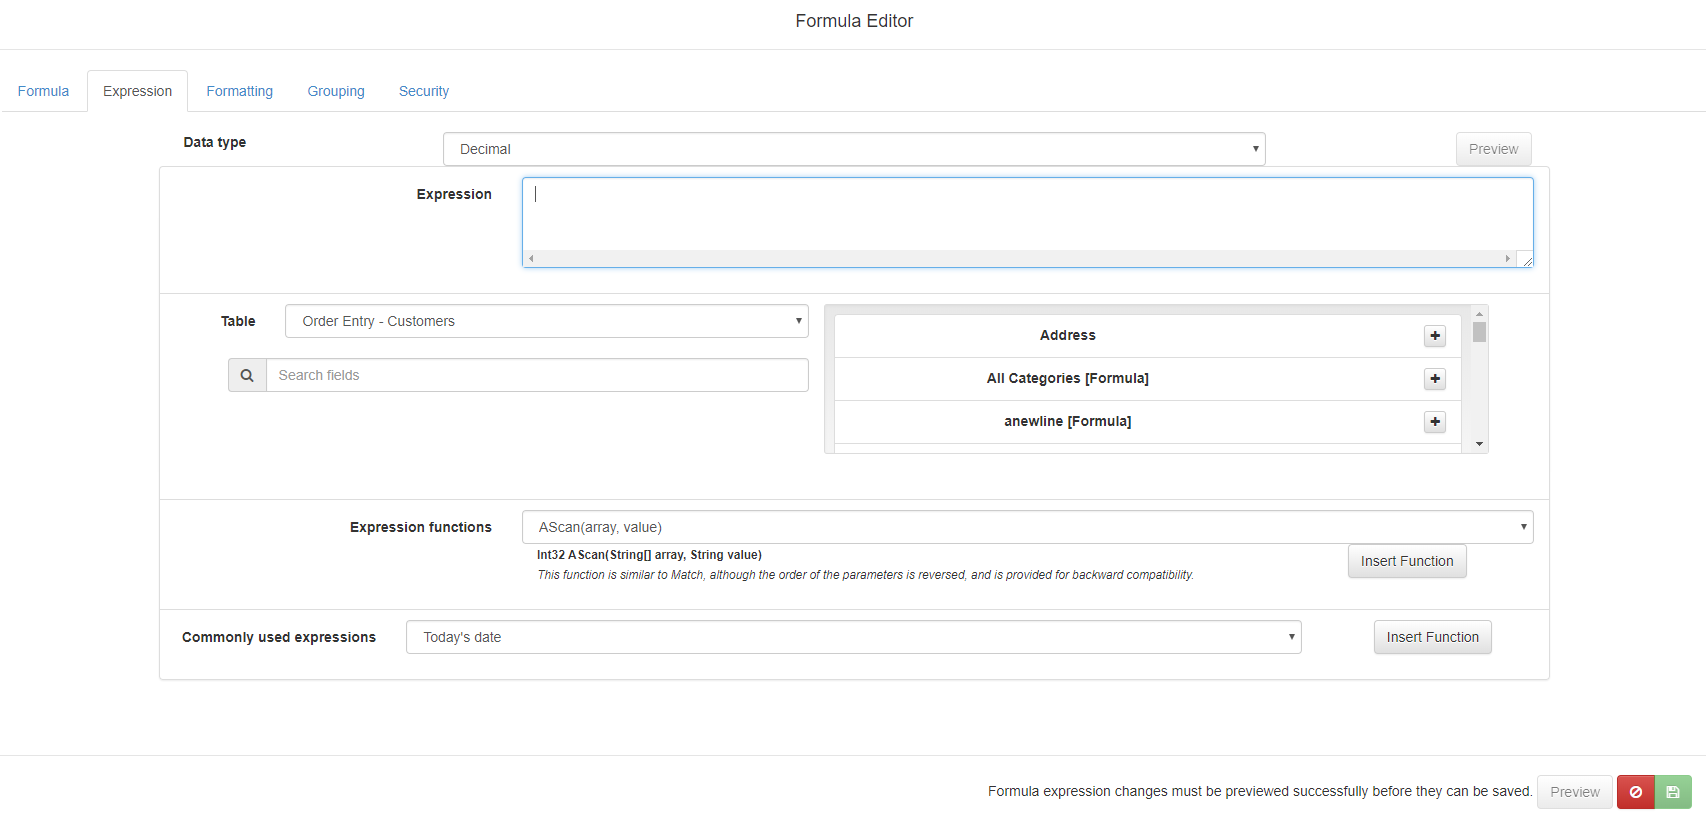
The Expression page has the following options:
-
Data type: the data type for the formula’s result. This is normally filled in automatically after you’ve entered the formula, but you can change it if necessary. The choices are:
-
Boolean: choose this for expressions that result in true or false (or yes or no) values.
-
DateTime: this is for date/time values.
-
Decimal: this is normally used for monetary values. The range of values supported is ±7.9 x 10⁻²⁸ to ±7.9 x 1028).
-
Double: this is often used for non-monetary numeric values, as it has less precision but a bigger range than Decimal: ±5.0 x 10-324 to ±1.7 x 10308.
-
Int16: a 2-byte integer value. The range is -32,768 to 32,767.
-
Int32: a 4-byte integer value (the most common integer value). The range is -2,147,483,648 to 2,147,483,647.
-
Int64: an 8-byte integer value. The range is -9,223,372,036,854,775,808 to -9,223,372,036,854,775,807.
-
String: choose this for text values.
-
-
Preview: click this button to test and preview the results of the expression. If there’s an error in the expression, an error message displays. Otherwise, the results of the expression from the first ten records of the specified table show in a preview window. Any fields involved in the expression are also displayed so you can check the accuracy of the expression. Note that you must preview a formula to confirm that it works before you can save it. If Data type isn’t set correctly, the Formula Editor changes it to the data type found after previewing.
The controls below the Preview button form an expression builder, which helps to create the expression using friendly table and field names or available functions and expressions. In addition to being available for editing formulas, you can also use this interface to help build filter condition expressions, display expressions, and conditional format expressions.
The first option in the expression builder is the expression for the formula. You can type the formula if you wish, but it’s much easier to use the expression builder controls (discussed later) instead. Note that formulas are displayed using real table and field names, another reason why it’s easier to edit them using the expression builder controls. Here’s an example of an expression that calculates a 5% commission of the sales amount:
Transaction.Amount * 0.05
The expression can contain any of the built-in functions; see the Expressions and Function Reference topic for information on expression and the functions available to be used.
Select the table to choose fields from with the Table control, then click the  beside a field to add its real name to the end of the expression.
If you prefer to see the real table and field names rather than the captions, you can toggle the button to do so.
You can also choose from either a list of functions built into Horizon Reports, or from a list of commonly used expressions. The Expression functions drop-down list shows the available function and the arguments each accepts. When you select one, information about the function is displayed below the list, including the data types of the return value and arguments and a description of the function. The commonly used expressions drop-down list gives a description of what the expression will evaluate to. Click the Insert Function button to insert the selected function or commonly used expression into the expression.
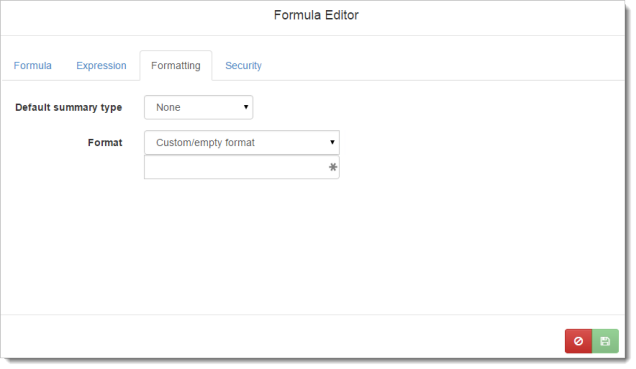
The Formatting page has the following options:
-
Default summary type: this setting specifies the default summary setting for the field in a report. For example, if this is set to Sum, when the field is added to a report, Horizon Reports automatically sums the field.
-
Format: the format to use for the field. See the Data Selection topic for details on formats.
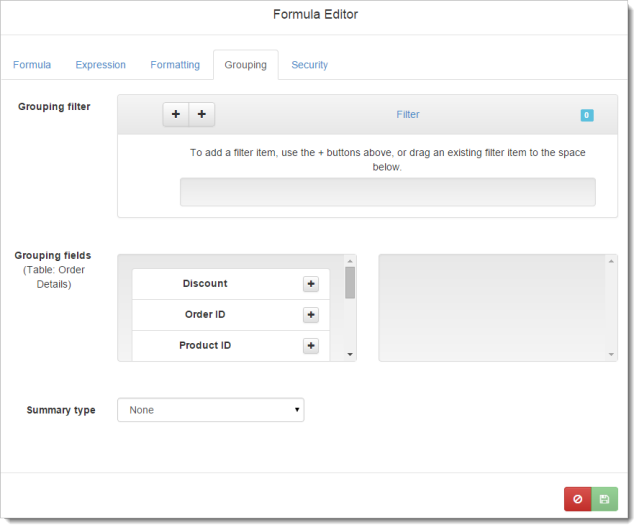
The Grouping page, which only appears if Formula type is set to Grouping formula, has the following options:
-
Grouping filter: the filter conditions for the grouping formula. See the Selecting Which Records to Include topic and its sub-topics for information how filtering works.
For example, suppose the formula calculates last year’s sales for each customer. In that case, the formula would go in the Customers table and the expression would be the Amount field from the Orders table. The filter condition would be on the Order Date field, use the is between operator, have Compare To set to Expression and use as the two values “Date(Year(Now()) - 1, 1, 1)” and “Date(Year(Now()) - 1, 12, 31)”. The first expression gives January 1 of the previous year: the Now() function gives the current date, Year(SomeDate) gives the year of the specified date, subtracting 1 from the year gives the previous year, and Date(Year, Month, Day) gives January 1 of that year. The second expression is similar but gives December 31 of the previous year.
-
Grouping fields: the fields used to group the data on to create the final value. Click the
button to add a field to the selected list; click  to remove a field from the selected list.
Continuing the previous example, the grouping field should be Customer ID because that’s what the totals are calculated for: each customer by their ID.
-
Summary type: the type of summarization to do to the data to create the final value. The choices are Sum, Average, Highest, Lowest, Count, Count Distinct, or Concatenate. Sum and Average are only available for numeric fields.
The difference between Count and Count Distinct is that Count counts the number of records while Count Distinct counts the number of records having unique values in this field. For example, if there are 100 order records but all orders were placed this week, using Count on the Order Date field would display 100 but Count Distinct would display 7 (assuming at least one order was placed every day this week).
Concatenate is used for text fields when you want to combine the values of several records into a single, comma-separated value in one record. For example, suppose you want to show which products each customer purchased. If you add the customer name and product name to the report, you’ll see one record for every purchase a customer made, so there may be many records for each customer. If you only want each customer to appear once, create a grouping formula in the customers table with an expression of the product name, Summary set to Concatenate, and Grouping fields set to the customer number. Now, when you add company name and this formula to the report, you’ll see each customer just once with a list of the products they purchased.
Choose the desired function from the drop-down list, or None for no summary value. In the example discussed above, this should be set to Sum.
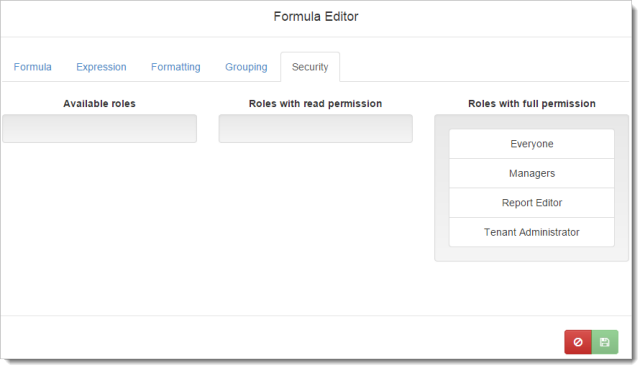
The Security page allows you to define the permissions for the formula. This page is only available for Administrator and Tenant Administrator users.
To specify that members of a role can use the formula but not edit or delete it, drag the role from the Available roles list to the Roles with read permission list. To specify that members of a role can use, edit, or delete the formula, drag the role from the Available roles list to the Roles with full permission list. To remove permissions for a role, drag it back to the Available roles list; members of that role cannot see or use the formula. The Administrator role doesn’t appear in any list because members of that role have full permission to all formulas.
To save the formula, click the  button, which is only enabled after the Caption and Expression settings are filled in. Click
  to cancel.
To see all of the formulas you’ve defined, choose Formulas from the Tools menu.
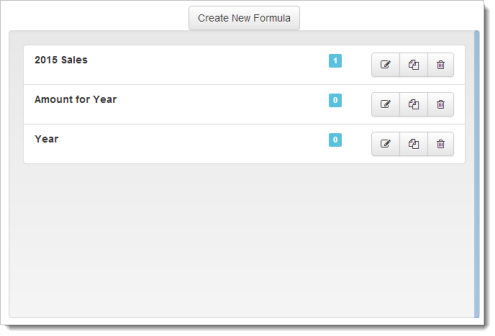
This dialog shows a list of the formulas you’ve defined. Beside each formula name is the number of reports using that formula; hover your mouse over the number to see the names of the reports. To add a new formula, click Create New Formula. To edit a formula, click the  button beside its name. Click Copy to copy the formula to a new one. The button removes a formula.