Step 2 allows you to select which fields appear in the report.
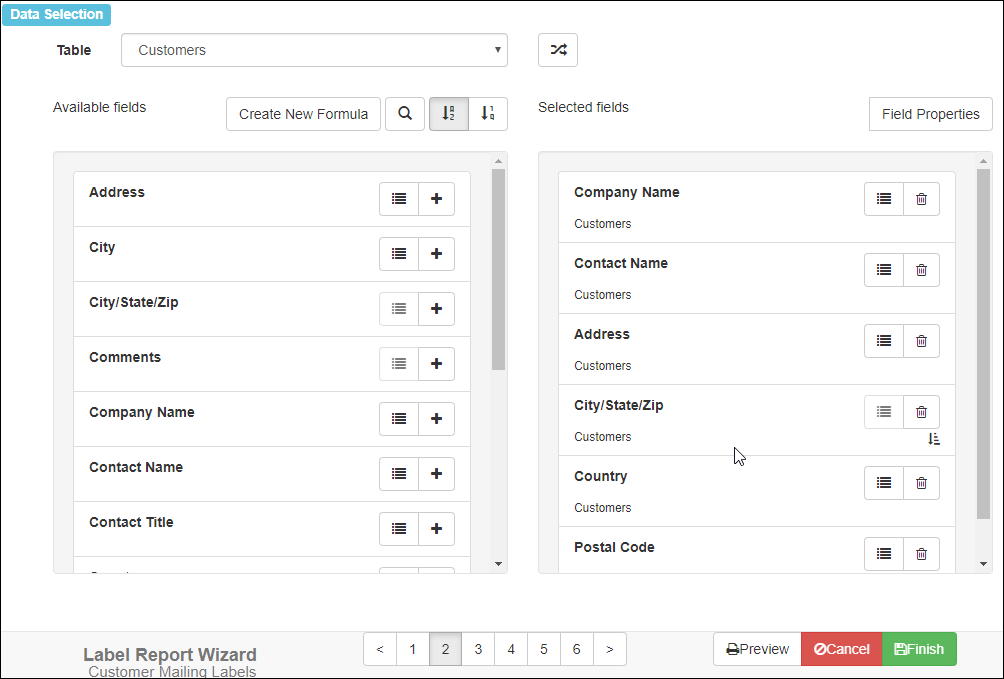
Available fields
The Available fields list shows the fields for the table selected in the Table drop-down list. You can choose fields from more than one table for a report; simply choose the desired table, add the fields you want from that table to the report, then select another table and do the same. Fields that are actually formulas have a suffix of “[Formula].”
Click the  button to have the Table drop-down list show only tables that are directly related to tables already selected for the report.
If you prefer to see the real table and field names rather than the captions, you can toggle the button to do so.
To scroll the list of fields, drag the scroll bar at the right of the list or use your mouse wheel.
Horizon Reports by default displays fields in alphabetical order. This makes it easy to find a field in the list. However, sometimes it makes more sense to display fields in the order they appear in the table. For example, for typical address fields, you would see this order alphabetically:
- Address
- City
- Contact Name
- Country
- Customer Name
- Postal Code
- Region
whereas they’d appear like this in table order:
- Customer Name
- Contact Name
- Address
- City
- Region
- Postal Code
- Country
Click the  button to display fields in table order. Click
  to display them alphabetically.
If there are a lot of fields in the Available fields list, it may be difficult to find the one you want. Click the  button and type some text in the box that appears; the list of available fields now displays only those fields containing that text somewhere in the name or caption. Click the button again to return to the full list.
The  button displays a list of the unique values in the field. This is handy if you’re not sure what data a field contains. This button may be disabled for certain fields.
The  button appears beside fields that are formulas. Click this button to edit the formula. To create a new formula, click the Create New Formula button.
Selected fields
The Selected fields list shows the fields to be included in the report. To add a field to the list, click the  button beside the field name in the Available fields list. Fields appear in the report in the order in which they appear in this list. To change the order in which the fields appear, simply drag the field up or down in the list. To remove a field from the Selected fields list, click the
  button.
Like the Available fields list, the Selected fields list includes the button to display a list of the unique values in the field and the button to edit a formula.
To scroll the list of fields, drag the scroll bar at the right of the list or use your mouse wheel.
Field Properties
Clicking the Field Properties button displays the Field Properties dialog. This dialog allows you to specify how the field is formatted.
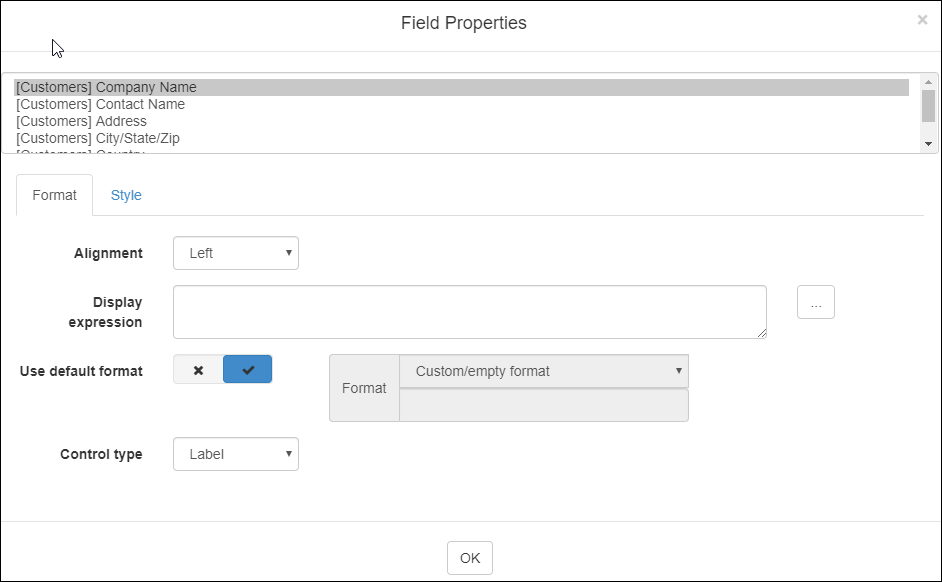
At the top of the dialog is a list of the selected fields in the report. Choose the desired field to edit its properties.
The options in the Format page of this dialog are:
-
Alignment: text alignment options for field headings and field contents. By default, numeric fields are right-aligned and all others are left-aligned. You can also choose center alignment or justified, in which case the left and right edges are aligned if there’s more than one line of text.
-
Use default format and Format: see the Formatting Values topic for details on how to format values in a report.
-
Control type: this option determines how the field is displayed. The default is Label.
| Type | Description | Example |
|---|---|---|
| Label | Displays the text of the field content. | Aniseed Syrup |
| Bar Code | Displays the content as a bar code. See below for additional options. |  |
| Checkbox | Displays a box with a checkmark in it if the field value is true or unchecked if false. |  |
| Image | Displays an image. |  |
| Rich Text | Displays formatted text if the field contains Rich Text Format (RTF) or HTML. |  |
| Zip Code | Displays the content graphically as a U.S. zip code. |  |
If you choose Bar Code for Control type, additional choices appear:
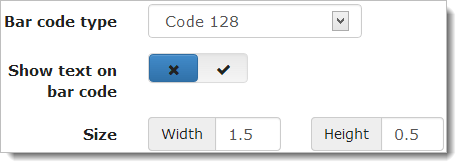
-
Bar code type: numerous bar code types are available, including Code 128 (the default), QR Code (for creating QR codes capable of being scanned by smart phones), and PostNet for U.S. zip codes.
-
Show text on bar code: if this is turned on, the text of the field’s value appears along with the bar code.
-
Size: specify the height and width for the bar code.
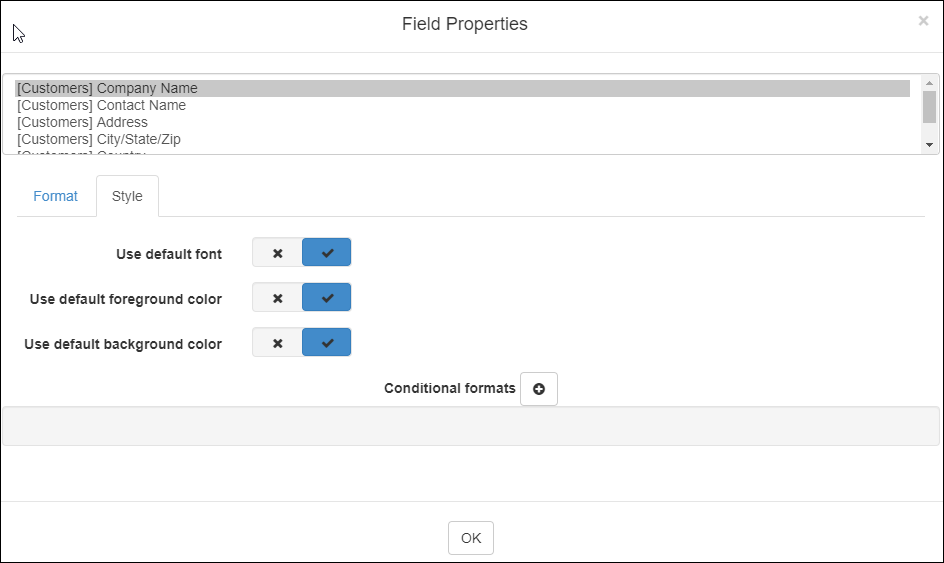
The Style page has the following options:
-
Use default font: if this option is turned on, which it is by default, this field uses the font specified in the template for the report, even if the default font is changed after the field is added to the report. To change the font, turn this option off and choose the desired font name, size, and style.
-
Use default foreground color: if this option is turned on, which it is by default, this field uses the text color specified in the template for the report, even if the color is changed after the field is added to the report. To change the color, turn this option off and choose the desired color by clicking the color bar and choosing from the Color dialog.
-
Use default background color: if this option is turned on, which it is by default, this field uses the background color specified in the template for the report, even if the color is changed after the field is added to the report. To change the color, turn this option off and choose the desired color by clicking the color bar and choosing from the Color dialog.
-
Conditional formats: conditional formats allow you to conditionally change the font or color of the field’s value based on a condition. Click the
 button to add a condition. The following options appear:
-
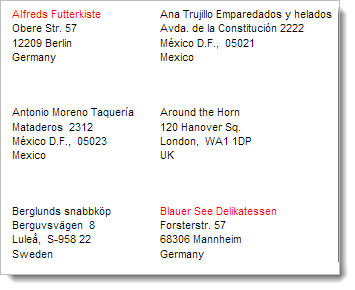
Condition: the expression for the condition. the expression for the condition. This can use any valid expression, including any of the built-in functions you wish. The condition must evaluate to a Boolean (true or false or yes or no) value. For example, using an expression of “Country = ‘Germany’” and a foreground color of red for the Company Name field results in:
-
Use default foreground color: If this is turned off, you can specify the foreground color to use if the expression is true. If the setting is turned on, the foreground color of the field or template is used in all cases (even if the expression is true).
-
Use default background color: If this is turned off, you can specify the background color to use if the expression is true. If the setting is turned on, the background color of the field or template is used in all cases (even if the expression is true).
-
Font: the font name, size, and style to use if the expression is true. If the expression is false, the font settings of the field or template are used.
You can create as many conditional formats as you wish. Click the
button to remove a conditional format. -