When you run a report, you often do not want every available record displayed or printed. Selecting a subset of records to work with is called filtering. The Filtering page of the report wizards allows you to specify which records are included in the report.
This page has the following options:
-
Filter conditions: this section has filter conditions that determine which records to include in the report.
-
Exclude conditions: this section has filter conditions that determine which records to exclude in the report.
-
Fields: this drop-down list allows you to determine which fields are displayed when creating a filter condition. Show all fields means display all fields whether they are included in the report or not, Show selected fields only means display only those fields in the Selected Fields list for the report, and Show selected tables only means display only those tables being used in the report.
Creating a Filter
A filter is made up of one or more conditions. A single condition compares a field to a value. For example, “Order Amount is greater than $100.00” is a condition that only allows those records with an order amount of more than $100.00 to appear in the report.
A condition is made up of either three or four parts, depending on whether it’s the first condition in a filter or not: the field to filter on (for example, Order Amount), the operator, the value or values, and the connection.
Operator
How the field is compared to the value is called the operator. There are several operators available; they are shown in the table below. Some operators use more than one value; for example, is between requires two values (as in “Order Date is between 01/10/96 and 12/31/96”). Other operators do not use any value; for example, “Zip code is blank” is either true or not without needing a value.
| Operator | Description | Example | Info |
| equals | The data stored in the field must exactly match the value you specify. | Last Name equals Johns | The report shows only records with “Johns” as the last name. Records with “Johnston,” “Johnson,” and “Johnstone” are not included. |
| does not equal | The data stored in the field may be anything but the value you specify. | City does not equal Calgary | |
| begins with | The data in the field starts with the value specified. | Last Name begins with Johns | The report shows records with “Johns,” “Johnston,” “Johnson,” and “Johnstone” as the last name. This operator only appears for string fields. |
| does not begin with | The data in the field starts with anything but the value specified. | Last Name does not begins with Johns | The report shows records other than those with “Johns,” “Johnston,” “Johnson,” and “Johnstone” as the last name. This operator only appears for string fields. |
| ends with | The data in the field ends with the value specified. | Last Name ends with son | The report shows records with “Kingston” and “Johnson” but not “Johnston” as the last name. This operator only appears for string fields. |
| does not end with | The data in the field ends with anything but the value specified. | Last Name does not end with son | The report shows records other than those with “Kingston” and “Johnson” as the last name. This operator only appears for string fields. |
| contains | The field has the specified value anywhere in the data it contains. | Outline contains Federal Gov | All records with “Federal Gov” somewhere in the Outline field are included. This operator only appears for string fields. |
| does not contain | The field does not have the specified value anywhere in the data it contains. | Outline does not contain Federal Gov | This operator only appears for string fields. |
| is blank | Includes all records where the specific field is empty or contains an unknown (null) value. | ZipCode is blank | |
| is not blank | Includes records where the specific field contains data. | ZipCode is not blank | |
| greater than | Includes records where the specific field contains a value in excess of the specified value. | Amount is greater than 100 OR City is greater than M | |
| greater than or equal | Includes records where the specific field contains a value in excess of or equal to the specified value. | Amount is greater than or equal to 100 OR City is greater than or equal to M | |
| less than | Includes records where the specific field contains a value under the specified value. | Amount is less than 100 OR City is less than M | |
| less than or equal | Includes records where the specific field contains a value under or equal to the specified value. | Amount less than or equal to 100 OR CITY is less than or equal to M | |
| is between | Includes records where the specific field contains values in a specified range. | Amount is between 150 and 250 OR Date Started is between 05/01/94 and 12/31/94 | |
| is not between | Includes records where the specific field does not contain values in a specified range. | Amount is not between 150 and 250 OR Date Started is not between 05/01/94 and 12/31/94 | |
| is one of | Includes records where the specific field contains one of up to ten specified values. The equivalent expression would be created using ten separate “equals” conditions. | City is one of Tokyo, Calgary, New York | |
| is not one of | Includes records where the specific field does not contain one of up to ten specified values. The equivalent expression would be created using ten separate “does not equal” conditions. | City is not one of Tokyo, Calgary, New York | |
| is Yes | Includes records where the specific field contains Yes or true. | Active is Yes | This operator only appears for Boolean (true or false or yes or no) fields. |
| is No | Includes records where the specific field contains No or false. | Active is No | This operator only appears for Boolean (true or false or yes or no) fields. |
Connection
Conditions are connected together with a connection. The connection can be either AND or OR. The AND connection means the two conditions it connects must both be true for a record to be included in the report, while the OR connection means that either one or both can be true for a record to be included.
You can think of AND as “more restrictive.” For example, if the first condition is “City equals San Francisco,” that gives a certain set of records. Adding a second condition such as “Order Amount is greater than 100.00” using the AND connection means that for any given record, the city must be San Francisco and the order amount must be greater than $100.00. Since that excludes San Francisco records with an order amount of less than $100.00 (which just specifying the first condition includes), these two conditions together are more restrictive (there are fewer records in the report) than either of these conditions alone.
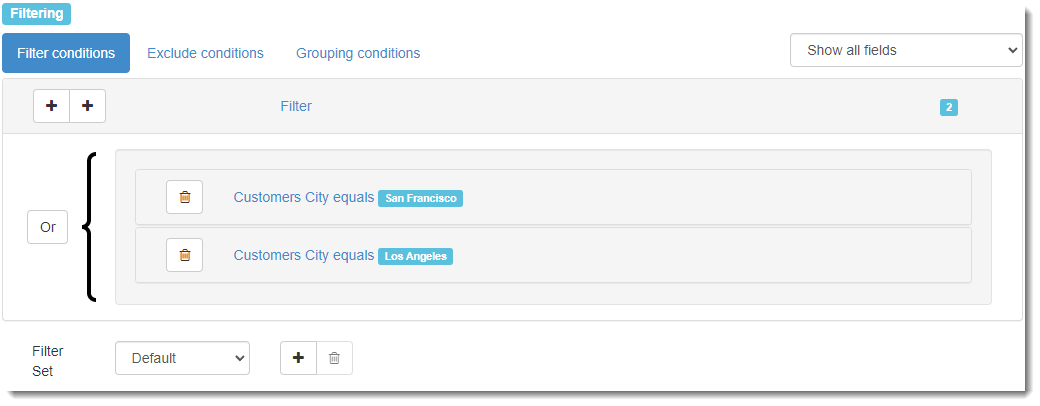
You can think of OR as “less restrictive.” For example, if the first condition is “City equals San Francisco” and you add a second condition such as “City equals Los Angeles” using the OR connection, this means that for any given record, the city can either be San Francisco or Los Angeles. These two conditions together are less restrictive than either of these conditions alone, since the report includes records matching both conditions.
Notice the use of AND and OR with filters can be the opposite of how these words are used in English. For example, someone might say “print out all of our customers from San Francisco and Los Angeles.” You might think you use the AND connection in this case, but in fact you use the OR connection since you want records where the city is either San Francisco or Los Angeles. The way to think of it is this: for each record, check each condition. It is not possible, for example, for the city for any one record to be both San Francisco and Los Angeles at the same time. It could be either one, however, so OR is the correct connection to use.
Watch out if you need to use both AND and OR connections in a filter. Conditions connected with AND are evaluated before those connected with OR. For example, if you want all customers from San Francisco or Los Angeles where the sales amount is more than $50, you might think you could use “City equals San Francisco or City equals Los Angeles and Sales is greater than 50.” However, this likely won’t give you the results you want because the AND is evaluated first. So, this gives all customers from Los Angeles where the sales amount is more than $50 (the second and third conditions ANDed) or those from San Francisco regardless of the sales amount (the first condition).
If you need to use both AND and OR connections in a filter, you need to use filter groups. All the conditions in a filter group use the same connection. Filter groups are connected together using another connection. So, to get all customers from San Francisco or Los Angeles where the sales amount is more than $50, use one filter group of “City equals San Francisco or City equals Los Angeles” and another of “Sales is greater than 50.” The two groups are connected using AND. Internally, the filter condition is handled with parentheses: “(City equals San Francisco or City equals Los Angeles) and Sales is greater than 50.” However, filter groups make it easier to understand how the conditions are combined than worrying about where parentheses should go and how many there are.
The Filter Page
The Filter page of the report wizards allows you to see the conditions that make up the filter, add new conditions, and edit or remove conditions.
Adding a filter condition
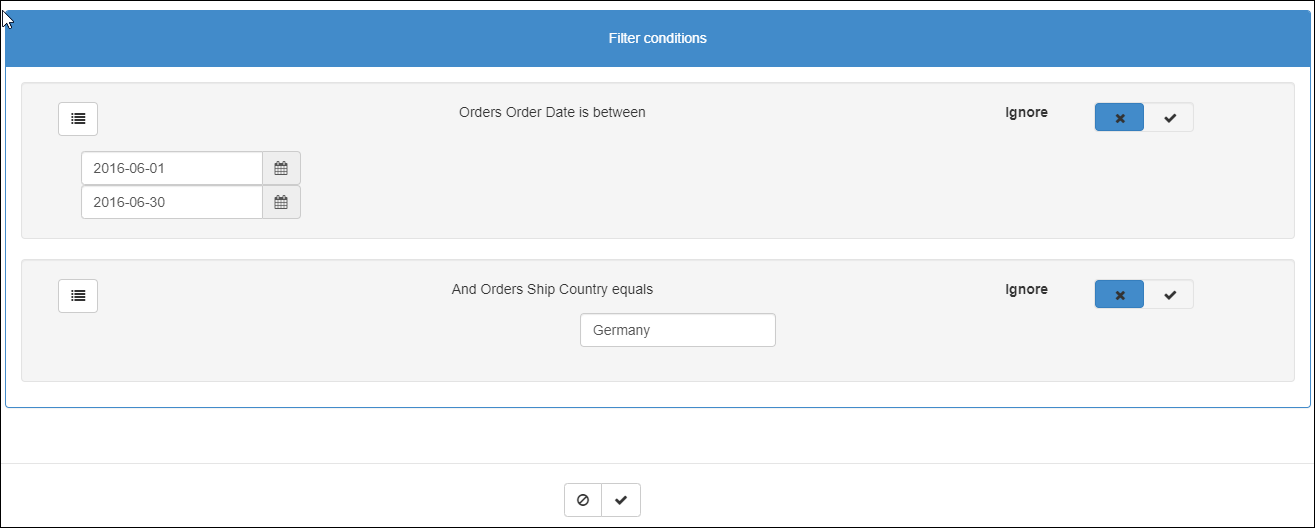
To add a new condition to the filter, click the left  button. The new condition appears within the filter group you clicked the button for. The condition’s bar shows the settings for the condition: the field name, the operator, and the values.
If you already have at least one condition in the filter group, the Filter Condition dialog appears a little differently.
The connection button, which does not appear if this is the first condition for your filter group, is used to define how this condition is connected to the previous condition in your filter. The default connection is and, but you can also choose or by clicking the button. See the Creating a Filter topic for a discussion of how connections work. The black brace shows which conditions are connected with a particular connection.
The table drop-down list shows the tables you can select fields from. The field drop-down list shows the fields you can filter on from the selected table. The Fields drop-down list allows you to determine which fields are displayed when creating a filter condition. Show all fields means display all fields whether they are included in the report or not, Show selected fields only means display only those fields in the Selected Fields list for the report, and Show selected tables only means display only those tables being used in the report.
After selecting a field, select a comparison operator from the operator drop-down list. The options that appear in this list depend on the type of field selected. For example, for Boolean (true or false or yes or no) fields, the only choices that appear are is Yes and is No. See the Creating a Filter topic for a discussion of how operators work.
Once you’ve selected an operator, you may enter a value to compare to the field. You won’t be allowed to enter a value if you choose the is blank, is not blank, is Yes, or is No operators. If you choose the is between or is not between operators, you must enter two values. If you choose the is one of or is not one of operators, you can enter up to ten different values.
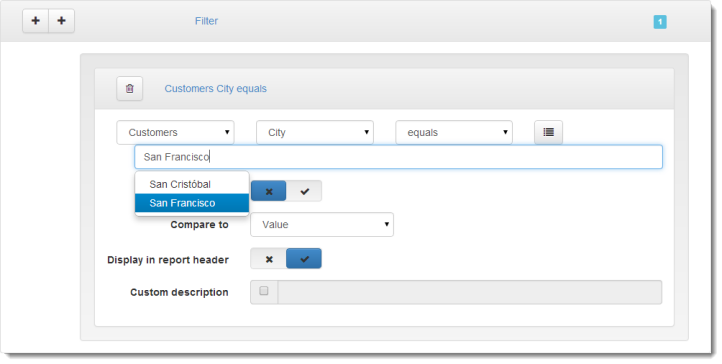
When you start typing a value, Horizon Reports checks whether there are any values in the field the filter condition is for that start with what you’ve typed. If so, it displays the choices in a drop-down list. For example, if your database contains cities named San Cristóbal and San Francisco, you’ll see the following when you type “San”:
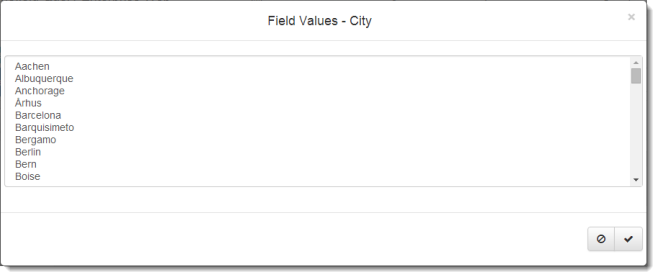
If you’re not sure what values appear in the field or want to select a value without having to type it, click the  button. A list of unique values from the field appears in the Field Values dialog. You can choose a single value or multiple values; to select more than one value, hold down the Ctrl key as you click the desired values. If you choose more than one, the operator is automatically changed to is one of.
If you select a date field, type the desired date in the format YYYY-MM-DD (or YYYY-MM-DD HH:MM:SS if Use date only is turned off), where YYYY is the year, MM is the month number, DD is the day number, HH is the hours, MM is the minutes, and SS is the seconds; for example, January 4, 2014 is 2014-01-04. To display the date without the time, turn on Use date only. Instead of typing the date, you can click the  button at the right of the text box to display a calendar. When the calendar is displayed, you can select a date by simply clicking it. Click the left or right arrows to move to the previous or next month.
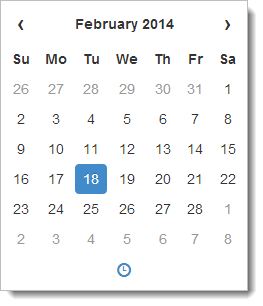
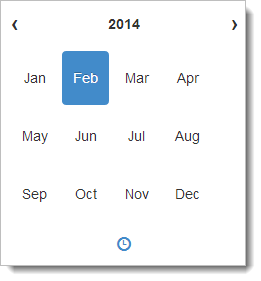
Click the month at the top of the calendar to display a list of months in the selected year you can select from. Clicking a month moves the calendar to that month. Click the left or right arrows to move to the previous or next year.
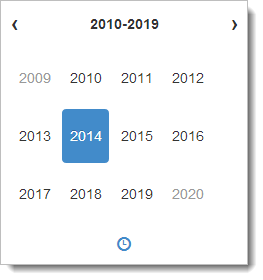
Click the year at the top of the calendar to display a list of years in the selected decade. Clicking a year displays the months for that year. Click the left or right arrows to move to the previous or next decade.
If Use date only is turned off, the bottom of the calendar has a  button. Click this button to display the time with up and down buttons to make it easy to change the hours and minutes.
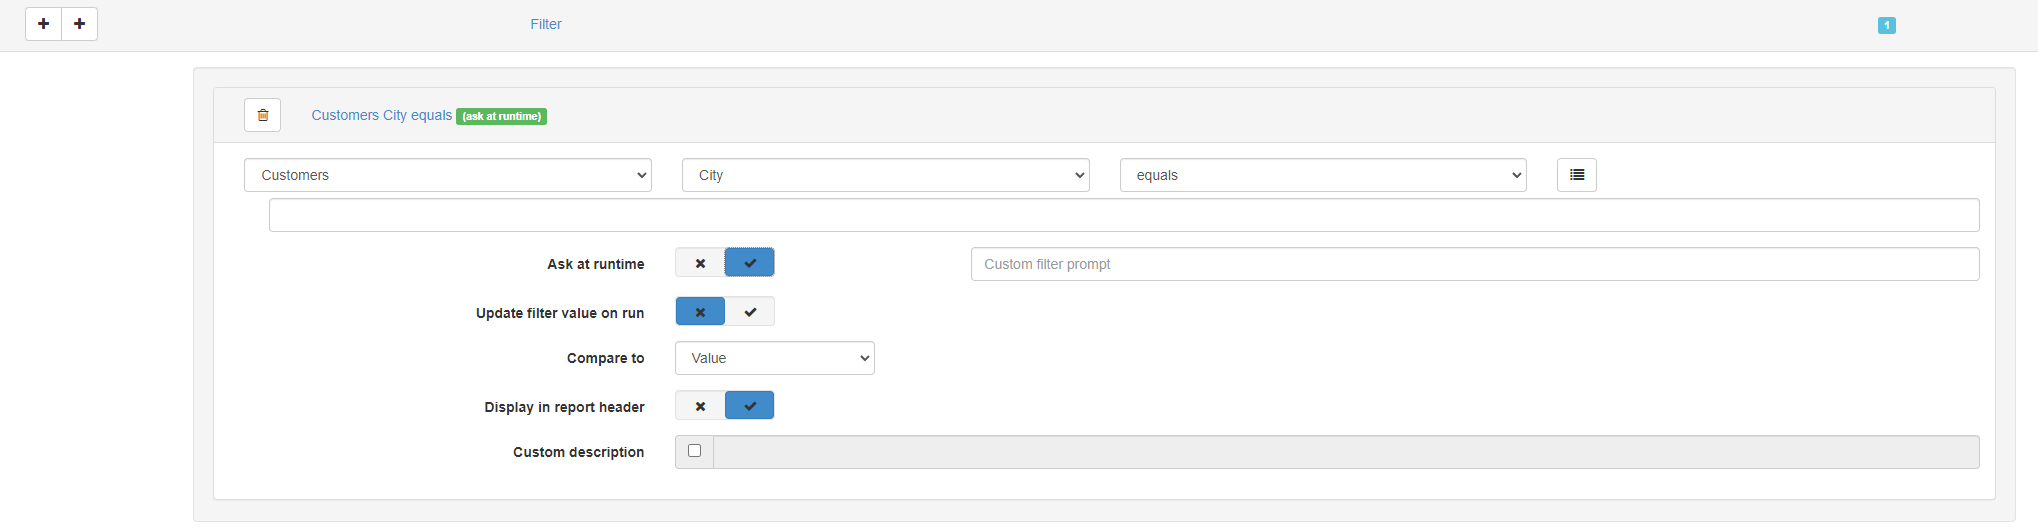
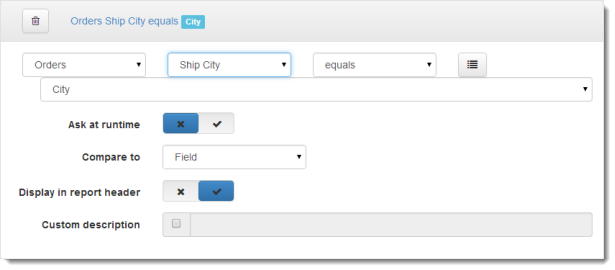
If you want to be prompted to enter the values when you run the report, turn on the Ask at runtime option. With this option turned on, an additional option, Update filter value on run, will be visible. If you turn this option on, then the value entered for the filter prompt when the report is run will be saved and used as the default value for the prompt the next time the report is run.
To compare a field to another field rather than a value, select Field from the Compare to option (the default is Value, which means a value is used). Select the field to compare against in the drop-down list that appears in place of the value text box. Note that this only allows you to select fields from the same table and the same data type as the field you’re filtering on; for example, if you choose a date field, only date fields from the same table appear in the list. Also note that Compare to isn’t available if you choose the is blank, is not blank, is Yes, is No, is one of, or is not one of operators. To compare a field in one table to a field in another table, use a database expression (described next) and specify the name of the field in the other table as the expression.
To compare a field to an expression, select either Database Expression or Expression from the Compare to option. The difference between the two is that Database Expression is an expression the database engine evaluates and Expression is an expression that Horizon Reports evaluates. Typically, you’ll use Database Expression to specify a field or a function that you know the database engine can evaluate and you’ll use Expression for any other type of expression.
Enter the expression into the text box. For example, to look for all records with a date field falling in the last week, use the “is between” operator and AddDays(Now(), -7) for the first expression and Now() for the second expression. Since Now() gives today’s date and AddDays() adds the specified number of days to a date, AddDays(Now(), -7) is seven days ago, so this gives all records with the date being between one week ago and today. The Expressions and Functions Reference topic has a list of the most useful functions.
If you turn on the Ask at runtime option for a filter with an expression, then the expression will be evaluated before the report is run, and the resulting value will be used as the default value for an Ask at runtime filter prompt.
Note that the “is one of” and “is not one of” operators are only available if Compare to is set to Value.
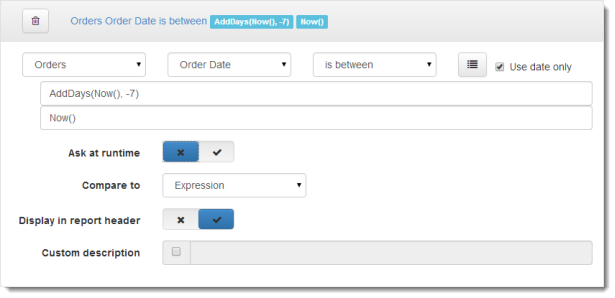
By default, filter conditions are displayed in the header of the report. If you don’t want a particular condition to be displayed, turn off the Display in report header setting. This is useful for reports that have a lot of filter conditions, which can get quite long when listed in the report header. You might in that case turn this option off for all but ask-at-runtime conditions.
The condition is displayed in the report header as Field Operator Value, such as “City equals San Francisco” or “Active Is Yes.” If you want to customize the description, turn on Custom description and enter the desired description. For example, “Active customers” might be a more meaningful description than “Active Is Yes.” If you want to use an expression rather than fixed text, surround the expression with “{“ and “}” (without the quotes). Note that the expression must evaluate to a string value, so use the Str() function if necessary to convert non-string values such as dates and numbers to their string equivalent.
Here’s an example of an expression that displays “Customers in
{"Customers in " + GetConditionValue(1)}
GetConditionValue is a built-in function that returns the value for the condition as a string; specify “1” for the first value, “2” for the second value, and so on (a condition only has more than one value if the “is between” or “is one of” operators is used).
After you’ve finished with the condition, you may wish to click its bar to collapse the condition settings so they don’t take up as much room.
Adding a filter group
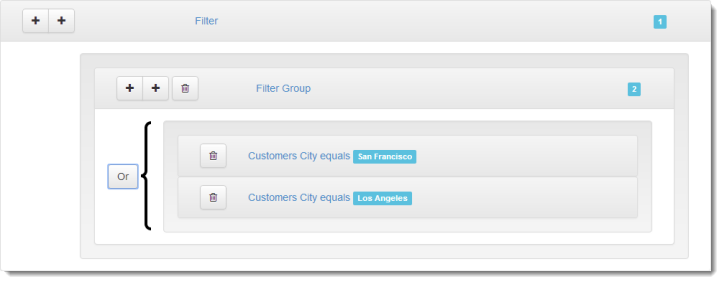
As discussed in the Creating a Filter topic, filter groups are used to group filter conditions that use the same operator. Filter groups are connected together using another connection. So, to get all customers from San Francisco or Los Angeles where the sales amount is more than $50, use one filter group of “City equals San Francisco” connected with OR to “City equals Los Angeles” and another filter group of “Sales is greater than 50.” The two groups are connected using AND.
The only complication is the order in which you create conditions and groups. If you know you’ll need at least one filter group, start by creating one by clicking the right-most button. Don’t worry if you didn’t realize until later that you needed a group; we’ll show you later how to rearrange conditions into groups.
To use the example of customers from San Francisco or Los Angeles where the sales amount is more than $50, do the following:
-
Click the right-most
button to create a new filter group. -
Click the left
button in the new group to create a filter condition and change the settings for the condition to City equals San Francisco. The filter page should look like this: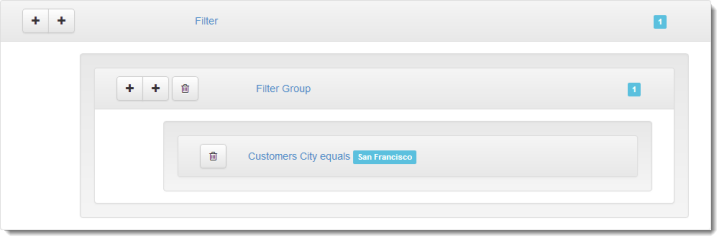
-
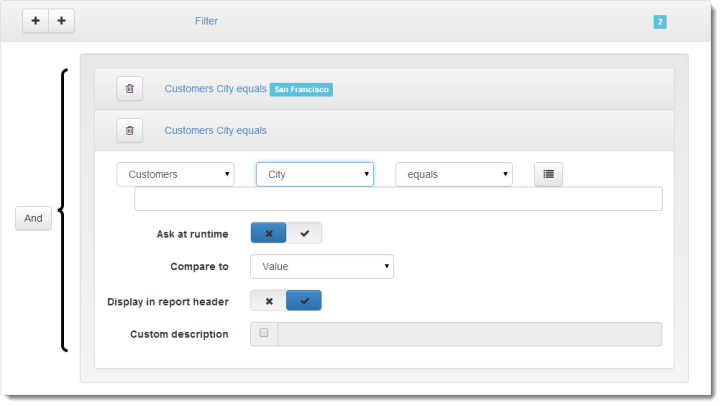
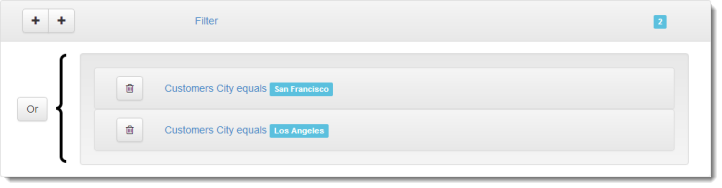
Click the left
button in the new group again to create another filter condition and change the settings for the condition to City equals Los Angeles. Click the connection button (which defaults to And) to change it to Or. The filter page should now look like this: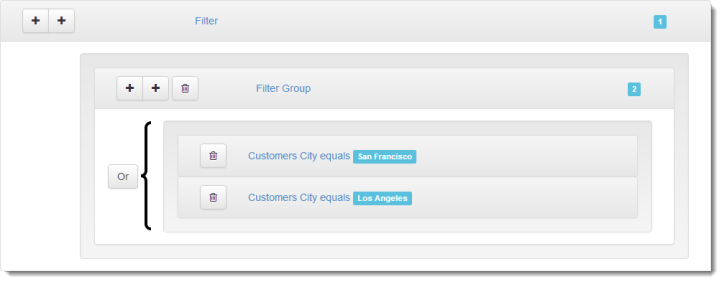
-
Click the right-most
button in the top (not the new) group to create a filter group. -
Click the left
button in the new group to create a filter condition and change the settings for the condition to Total Price is greater than 50. The filter page should now look like this:
Rearranging Conditions
Suppose you missed the first step, creating a filter group, in the instructions above, and then realized you needed a group once you’d created the two conditions on City. Now adding a filter group adds it under the second condition, which isn’t where you want it. How would you fix that? The solution is to rearrange conditions by dragging them.
Starting from just the two conditions, do the following:
-
Click the right-most
button create a filter group.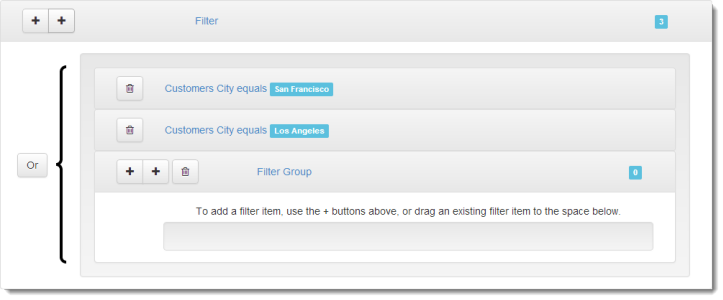
-
Drag the bar for the first condition to the space inside the new group that indicates you can drag a condition to it.
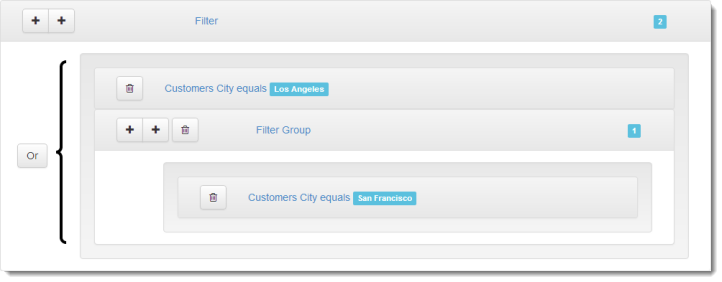
-
Drag the bar for the second condition below the first condition.
-
Now that you’ve created a group for the two City conditions, you can continue on with the instructions to add the second group and the condition on Total Price.
Editing a condition
To edit a condition, click its bar to expand it if necessary and change any of the items that make up the condition.
Removing a condition
To remove a condition, click the  button in its bar.
Ask at Runtime Conditions
When you run a report that has any filter conditions with the Ask at runtime option turned on, you are prompted to enter the values for those conditions. If you entered a custom filter prompt value when creating this filter condition, you’ll see that text displayed with the prompt.
See the The Filter Page topic for information on how to enter values and using the button.
If you want a condition to be ignored for this run of the report, turn on the Ignore option. This acts as if the filter condition doesn’t exist. When you turn on the Ask at runtime option for a condition, you also have the option to turn on Ignore by default. If you do this, when the prompt for filter values appears, this filter condition will be initially set to ignored. This is useful if you want to define a set of default filters to choose from, but only one or a few at a time would make sense in a typical situation.
When you have entered the values for each of the conditions, click  to continue with the report. If you click
  instead, the report will not continue.
Additional Filters
Each report has a default set of filter conditions, even if there are currently no conditions added to it. If you want to be able to re-use a report, but filter it in different ways, you can create an additional set of filter conditions called a Filter Set.
To add a new Filter Set, click the button. You’ll be prompted to give the set a name, and then a clone of the currently selected Filter Set will be created with the new name. The conditions are copied to the new Filter Set rather than creating an empty one, because you might want to tweak just one or two things in a complex filter, without having to create the filter from scratch each time.
When editing a report, the currently selected Filter Set will be used when the report is previewed. However, reports previewed from the report explorer will prompt for the filter set to use if more than one is available. In addition, if a report has more than one Filter Set, you can choose which to use when scheduling the report